In certain industries, there is a strong need for users to enter transactions rapidly because the nature of these transactions involves multiple items or lines. For instance, in a retail store processing lengthy customer orders, or in a customer service setting where agents handle calls while simultaneously entering transactions, using a keyboard for navigation and data entry is essential. The default window in iDempiere already includes shortcuts for all toolbar buttons (such as create a new document, save, delete, undo, etc.), which can be viewed by hovering over the toolbar. However, standard shortcuts alone are insufficient for customer-facing industries that have very limited time for data entry. This is where Quick Form bridges the gap by providing intuitive shortcuts, such as pressing Enter to create a new line, or the Up arrow to return to the previous line. Quick Form itself was developed by Logilite Technologies, one of the contributors in the iDempiere community.
To get started with Quick Form, you need to log in using the System Administrator Role and select the specific columns that will be displayed in the Quick Form.
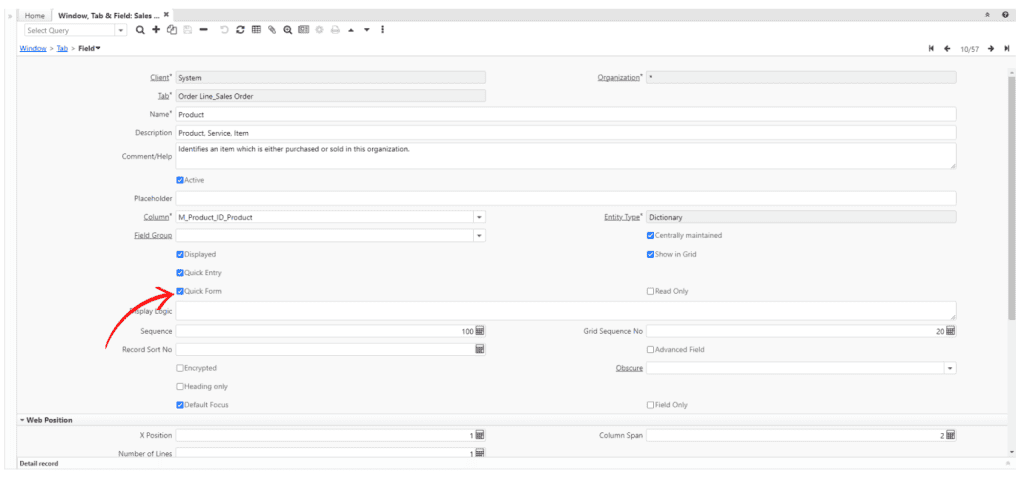
The image displays the configuration for the layout that will be shown in the Quick Form. Essentially, it demonstrates how we can determine exactly what elements are displayed.
To allow data entry for specific columns via the Quick Form, check the Quick Form flag on the respective Field. For example, in the Sales Order window, under the Sales Order Line tab, we will configure several columns—Product, Line No, Charge, Quantity, UOM, Price, and Description—so they can be entered through the Quick Form. Now, let’s try entering a Sales Order Line using the Quick Form. Open the Sales Order menu, enter a new Sales Order, and save it. On the Sales Order Line tab, click the Quick Form button to bring up the Quick Form pop-up window.

The image displays the configured Quick Form, which can then be clicked. The Quick Form is indicated by the arrow.

The Quick Form interface after it is clicked. It displays a table containing columns such as Product, Charge, Quantity, UOM, Price, and Description.

By default, the cursor is automatically positioned in the leftmost column. To proceed to the next column, press the Tab key, and the cursor will immediately move to the column on the right. Continue your data entry as usual for your first Sales Order Line. Once finished, press Enter to perform two actions simultaneously: saving the first Line and creating a new one. If you need to edit a previous Line, simply press the Up arrow key, and the cursor will move back to it. To return to the next Line, press the Down arrow key. Alternatively, you can create a new Line by pressing the Down arrow key on the very last Line.
All users can modify the layout or column arrangement within the Quick Form and maintain their own personalized view. Users can also adjust the default width of any displayed column. To change the column display order, simply click Customize at the bottom; a pop-up will then appear, allowing you to drag and drop the columns you wish to rearrange. Check the Save Column Width option to save the current column dimensions as your new default.

Tampilan Quick Form Pop Up
Several iDempiere shortcuts remain functional within the Quick Form, such as saving by pressing Alt+S. Once your data entry is complete, you can use the Alt+K shortcut or directly click the OK button at the bottom to close the Quick Form. As a basic guideline, the columns displayed in the Quick Form should strictly be those that are editable and genuinely require user input. Please note that columns configured to hide when another field is filled (Display Logic) will not function within the Quick Form. However, you can work around this by configuring the column to become uneditable instead (Read Only Logic).