In the world of enterprise resource planning (ERP) systems, the implementation process is a highly crucial stage to ensure users can utilize the ERP correctly and independently. The expectation is that users will eventually be able to perform all transaction inputs and conduct their monthly closings without any issues.
However, what often happens in practice is that users become overwhelmed when using an ERP due to overly complex procedures for inputting and checking transactions. Not to mention, the volume of stored data increases every month, and the users’ need for system-driven data analysis is growing. Without the creation of a data warehouse and dashboard software that supports such analytical work, the users’ tasks will be further hindered, leading to untimely closings.
Similar to other ERP systems, iDempiere has features that will support users in streamlining their closing process. First, always make sure to ask users who input transactions to frequently check the My Unprocessed Documents menu on the Home screen.

The image shows the location of the unprocessed documents.
Unprocessed Documents
Unprocessed Documents
If you pay attention to the Home screen, there is a label called “Unprocessed Documents”. There might also be a non-zero number next to it, indicating that there are documents you have inputted but not yet finalized (Completed or Voided). If you click on that label, you will be taken to the My Unprocessed Documents menu, which will display all unfinished documents. There are document numbers and document dates that should be your focal point when you want to finalize all the documents you might not have had the time to complete. To open a document, simply click the button in the Record ID column, and it will automatically take you to whichever menu that document is located in. After that, verify the completeness of the document and click “Complete” if it is a correct input, or “Void” if the document is a duplicate or an incorrect input. After performing a Complete or Void action, the document will automatically disappear from the Unprocessed Documents list. Repeat this step for all remaining documents until they are all finished.

The display of the clicked unprocessed document.
To ensure all users have completed all their Unprocessed Documents, you can check through the “Unprocessed Documents (All)” menu to view all unfinished documents. Once there are none left, the next step is to close the period using the Calendar Year and Period feature.

The display of the calendar year and period.
What is Calendar Year and Period?
Calendar Year and Period is a menu that stores the calendar used by the company. This calendar will store the Year and the Period (month – year). To start inputting transactions, you need to define the year and month for the transaction input dates. To do this, go to the Calendar Year and Period menu, and access Year. Click “Create New” and type the required year in the Name field. Click “Save”, and after that, click the “Create Period” button to automatically generate the months for that year along with the documents whose inputs will be controlled through the Calendar.

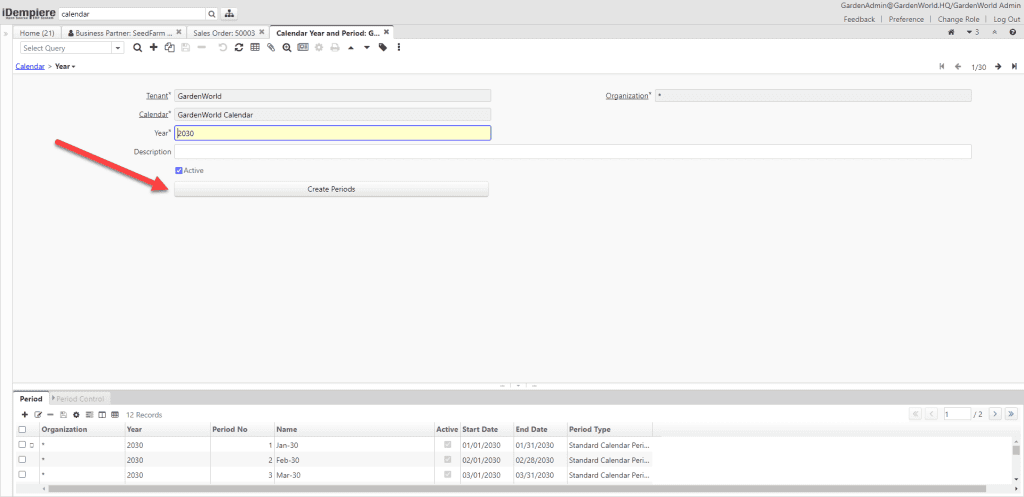
The Create Periods button indicated by the arrow.
Wait until the process is complete, and you will see the Period tab filled from January to December for that year. When you enter the Period tab, there is another tab at the bottom called Period Control. The Period Control here determines whether transactions for a specific document are ‘Open’ or ‘Closed’ for that month. Initially, all documents will be set to ‘Never opened’, meaning you cannot input transactions for any documents yet. What if you want to input a transaction? Click the gear button on the Period tab and click the “Open/Close All” button. Select the Period Action ‘Open Period’ and click OK. By doing this, you are ‘Opening’ all documents within that Period, allowing inputs to be made. All Period Statuses on the documents will change to Open.
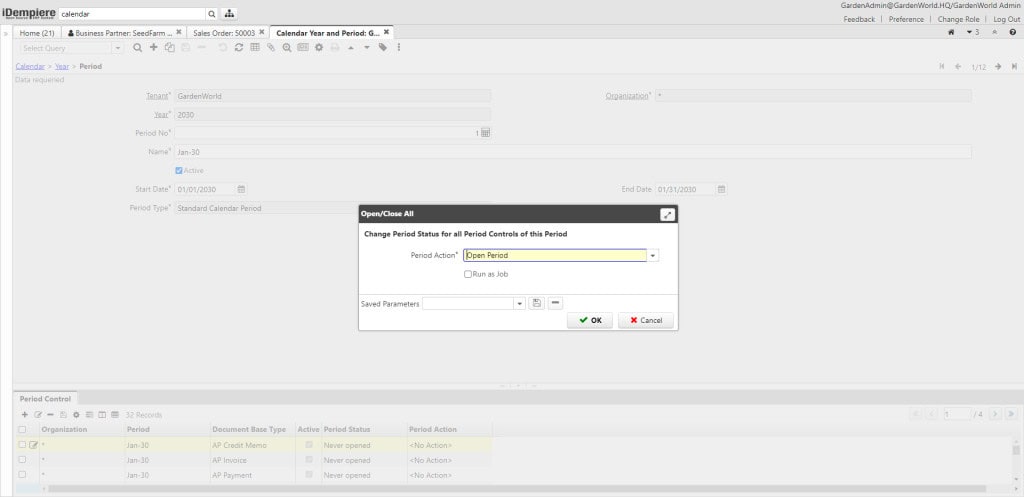
The open/closed all display.
When it is time for the monthly closing, to ensure there are no additional inputs or transaction corrections for the previous month, simply return to that Period and access the Open/Close All button again. This time, select the Period Action “Close Period” to change all documents to ‘Closed’ in that period. There is an option to “Permanently Close Period”, which is practically a very logical thing to do once you have completed the closing. However, as consultants in implementation, we always adhere to pragmatic principles; in our opinion, if an option does not provide a way to revert or correct it later, we will never recommend that method. Many might argue that there will be a loophole for users to secretly perform an Open Period. In our view, this can be adequately addressed by granting strict access only to specific authorized personnel who are allowed to perform Open and Close Period actions. Therefore, be careful if you choose the Period Action “Permanently Close Period” because this will make the Period impossible to Open again. If you wish to perform a Permanent Close, ensure you are absolutely certain there will be no need to modify transactions again in that month.
These are some simple but very helpful features when utilized by all users. Naturally, the company will continue to grow and increasingly require additional features to accelerate their work. This can be achieved by implementing various automations, such as using Robotic Process Automation (RPA) or workflow automation tools like Camunda. Make sure this becomes your SOP checklist when conducting the monthly closing so that when all inputs have been reconciled with physical documents, the only thing left is checking the system to see if any inputs have been ‘left behind’. A system can be equipped with the most advanced features, but it will ultimately only be as advanced as the users’ ability to properly use and leverage those features.
Share this article
All Categories, iDempiere, iDempiere
Implementasi Robot Framework pada Robot Process Automation – Implementasi
Implementasi Robot Framework pada Robot Process Automation – Tutorial Awal